*If there is anything you want me to expand on in this post please leave a comment and I will do a post about it*
A Costume Designer's role is to design and make costumes for a production or for manufacturing. Quite like the role of a fashion designer only more complicated and more to it.
If designing costumes for a production be it a play, film, advertisement or stage there is a big process to it.
If hired for a production you would generally meet with the Director to get a brief for the production itself. They will give you a script to which you need to read through with a fine tooth comb to understand the plot but to also be able to design the right costumes for it.
You will then do a costume plot. This means that you go through every scene in the production and take note of all characters in each scene and then start planning what they are supposed to look like and wear. What era is the production/play/film/show set in? What type of character are you designing for? Every character has their own personality so you need to jump into them and imagine what that type of person would wear and what you might think their style is then you move onto the scenes.
Here is an example: If you had Mary, John and Ann in a scene sitting in the back garden drinking tea and eating scones on a summers day that automatically tells you that you need two womens costumes, one mans and that it will be summer wear.
Say for instance John is 39 with green eyes and brown hair. He is a business man that is always away on business but has a couple of days off so is spending it with his family. He is not worried about fashion in fact his fashion taste comprised of corporate suits for work and for formal wear. You would assume he is in a suit, but wait it is summer and he is out sitting in the sun and his wife Mary likes to dress John when she gets a chance so he is not showing her up and looking corporate all the time, she likes to take over for such occasions, tell him what to wear and organize his outfit. Then I would think he would be wearing perhaps canvas coloured light summer slacks with a cream linen shirt that is light and airy for the hot weather.
But... you have started to imagine only one character in one scene's costume.
Now what would Mary be wearing? She is 33 which blue eyes and mousy blonde hair. She is a stay at home wife with a lot of hobbies that keeps her part of the community and keeps her busy while her husband is away. She likes to up-keep her garden and home and bake and do all those nice things to fill her day. Therefore, when John is home she likes to invite people around for tea and show off her lovely home and be social. She is quite content with this life for the time being and quite a simple person who is not into brands but likes to look like a lady and keep up appearances so she makes sure her hair is neat and that she looks well not a crease in sight so she that she is nothing to be talked about in the community so she plays it safe with her fashion and styling. I'm thinking put her in a nice summer dress with perhaps a pastel paisley print.
Now you have an idea of how you are going to dress Mary in that one scene and her one dress. Of course some scripts may have the whole story told in one day but that would be too easy :)
Now for our third character in this scene, Ann. Ann is John's sister and is not from the small town they live but lives in a big city and is quite fond of her fashion and does not care what small town folk think. She is in her late twenties with green eyes and black hair, pale skinned and has a vintage look about her. She likes to show her chest and often wears day dresses as her normal routine clothing along with evening gowns. She is single but not short of pursuers although she is fussy and knows what she wants her potential husband to be. She constantly comments on the fact that John is away from home too often and that Mary should come to visit her in the city more and have a bit more fun. She thinks John needs to work closer to home if they plan to have a family which makes Mary very uncomfortable as she does not how to respond because she knows she is right and worries that she might not want to have a child with John if he is never going to be there. So I would imagine Ann in deep purple or burgundy low front wrap dress to her knee, feminine and sheek.
Now you have a rough guess of what these three will be wearing in this scene but it is not final. Next you do the same with all characters and all scenes. Then you would sit down and finalize a few options, sketch out your characters in their costume and have a second option to show the director, then go get your swatches of material in different shades and fabrics to pin to a board with your sketch so you can start to picture it coming together. After you have done all this you would meet with the director and if he approves your ideas you have to go ahead to start and are more than likely given a budget to stick to.
NOTE! From experience the director's change their mind like the weather so expect to sew up full costumes and for him/her to change their mind about them right before you start a show or filming. You just have to try get it as right as you think you can. You might also like to change an idea if in the end if just does not suit or you just do not like it when it is made.
This is a quick post about what a costume designer is and what they do but it is not as black and white. It is very hard work. It can take a long time to do a costume plot and sketch out your ideas, colour them in, get fabric swatches to match your idea, etc and the director might tell you to scrap most of it and come up with other ideas. Then there is measuring the cast and doing fittings whenever the cast are free to see you and sometimes that can be very stressful as you might be really stuck for time. Hitting deadlines are crucial in this business.
Along with that when you do start making your costumes you need a team of helpers to get your vision completed. You need a costume assistant and wardrobe staff. Wardrobe have it hard too they have to do all the shitty jobs like when all the costumes are done and you have to lug them all to a van to bring to the location then to hang them up then to steam them then to dress the cast then to undress and pack everything away. It is quite tedious!
Not to mention it is all on the costume designers head to make sure everyone is doing their work well and that everything is prepared for each scene and everything is perfect. There can be a lot of problems along the way eg: "Where is Marys shoes for the tea party scene"? Answer = missing = panic stations = get random pair that might fit her! A million things can go wrong it is quite like a wedding day.
Set is tiring also you may watch the same scene being shot for hours and it could be only one minute of the film. Same goes for rehearsals in plays. The work is long and treacherous but quite fulfilling! The result is the reward.
When production is over the job is not done, everything needs to be put away and back in stock. I think the longest haul of working on a production as a costume designer, costume assistant or wardrobe person is the preparation for it, beforehand things are crazy as it is the unknown to will everything get done on time etc. All in all it is great fun really. I hope this gave you an insight into what a costume designer is. If you want me to write in more detail about anything mentioned in this post please comment or email me and I will do so.
Ps: The manufacturing side for me was sewing huge detailed costumes in a room that you would not swing a cat in so I hope you have plenty of room if you plan to make costumes from home to sell. In saying that this week I managed to make a cardboard Cuckoo Clock costume in my house, chopping thick cardboard with a stanley blade that took forever, painting it, glueing etc it was not glamorous but it is still possible with small space! So give it a bash anything is possible :D and a lot of fun when you see the result!
Friday 19 October 2012
Thursday 23 August 2012
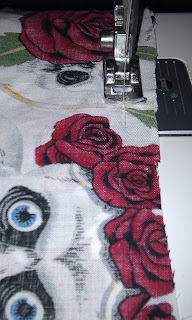
What is the easiest fabric to sew?
I would say 100% cotton or curtain material upholstery fabric. It is so easy to handsew or machine sew these fabrics so why not give it a bash!
The reason these are so easy to sew with is that they are sturdy and tightly woven to give you a smooth sewing session compared to say CHIFFON! If you want to make things a little easier for youself then stay away from chiffon for a bit until you are more experienced at least.
If you are new to sewing I would suggest buying some curtain lining to practise on. You should be able to buy a metre/yard of curtain lining for €2-€5. The colour of these fabrics are generally cream or white.
The great thing about practising on curtain fabric is that if you make a mistake it is no biggy because it was no major expense to purchase and you did not ruin a cool fabric that you were looking forward to making something out of. I have done this too many times, bought gorgeous fabric and instead of practising a new challenge on curtain fabric I used the cool new fabric, made a mistake, had no material left to redeem the garment and was left frustrated and down a couple of quid that it cost to buy the fabric and most annoying of all was being left with no garment! Not cool
So your best bet is to revert to the basics eg: if making a skirt practise on curtain material or white cotton then when you feel you have constructed it well, go out buy your fabric and perfect it second time around and then you will have a great result. Happy Sewing <3
Friday 10 August 2012
Tutorial: How to make a blind - with just one seam
Hi all,
Today I will show you how to make a gorgeous blind with just one seam and some glue. SIMPLES! Here is the finished result.

Click this link to bring you to my DIYhomeinteriors page on youtube. http://www.youtube.com/watch?v=R_SDe2jGciw to watch the video tutorial. I hope you found this tutorial useful. Happy Sewing <3
Today I will show you how to make a gorgeous blind with just one seam and some glue. SIMPLES! Here is the finished result.

What you will need:
- Curtain material/upholstery fabric
- A bottle of All Purpose Glue
- Thread
- A scissors
- A measureing tape
- An Iron
Click this link to bring you to my DIYhomeinteriors page on youtube. http://www.youtube.com/watch?v=R_SDe2jGciw to watch the video tutorial. I hope you found this tutorial useful. Happy Sewing <3
What is Seam Allowance?
Seam allowance also called inlays, is the space between the edge of the fabric to the stitching line when you go to sew two or more pieces of fabric together. The normal amount of seam allowance you leave is generally 5/8" for home sewers or 1/4" for industrial sewers. See an example of the right seam allowance on a measuring tape in the image below.

The reason seam allowance is essentail when sewing is because if you do not factor in seam allowance your garment or craft will be too small.
For example: I am making a pencil skirt and say I am making it in a UK size 10. If I cut out my material without seam allowance and sew it up that will mean my skirt will be too small and it will reduce the original UK size 10.
Most patterns you buy should have seam allowance included on the pattern but please read the info first to make sure before you cut it out and cut out your fabric. A mistake you dont want to make trust me... as it may be fun cutting out your pattern the first time and then your fabric but when you have to do it again straight after because you made that mistake it gets repetitive!
By adding 5/8" to the pattern that means I can sew that part in and then I will have my perfect size ten with the seam allowance as excess fabric that you can then trim down half way if you want to reduce the bulk. Happy Sewing <3

The 5/8" is highlighted within the red circle
The reason seam allowance is essentail when sewing is because if you do not factor in seam allowance your garment or craft will be too small.
For example: I am making a pencil skirt and say I am making it in a UK size 10. If I cut out my material without seam allowance and sew it up that will mean my skirt will be too small and it will reduce the original UK size 10.
Most patterns you buy should have seam allowance included on the pattern but please read the info first to make sure before you cut it out and cut out your fabric. A mistake you dont want to make trust me... as it may be fun cutting out your pattern the first time and then your fabric but when you have to do it again straight after because you made that mistake it gets repetitive!
By adding 5/8" to the pattern that means I can sew that part in and then I will have my perfect size ten with the seam allowance as excess fabric that you can then trim down half way if you want to reduce the bulk. Happy Sewing <3
Tutorial: How to make a wire headband
This tutorial will teach how to make an easy wire headband in the style of Rockabilly/Pin Up Girl/Vintage. This is so simple to make and turns out beautiful. When it comes to headbands these babies win hands down as they are really flexible with the wire being able to bend it whatever way you want, size depending on your own preference and they look really great on! Here is the finished product:

What you will need


If you would like to purchase any of these headbands you can find a variety of designs on my facebook page www.facebook.com/pinmeupireland

So here we go...
What you will need
- At least one half a yard/metre of fabric (I used 100% cotton)
- A sewing machine or if you have not got one you can hand sew it but make sure to sew tight stitches so it does not fall apart.
- A scissors
- Thread
- Measuring Tape
- Loop Turner to turn fabric inside out, again if you do not have one of these you can use your hands
- Aluminium Wire (The type that bends easily)
Firstly,
Measure your head: Get your measuring tape and wrap it around your head the way your would tie your headband around. When you have your head measured add an extra 5 inches on and this will make it long enough to bend. I measure the length to about 30 inches in total without seam allowance but it all depends on head size really.
Next cut out your fabric: Please not before cutting your fabric you want to add 5/8" seam allowance. Cut your fabric on the fold to the shape in the image. Cut it so that you have each end curved to give shape to the bow part of the headband.

This is what it will look like when you open it up, see image below.

Now you need to start sewing your headband together. You want to turn the fabric around and sew the faded part together so that when you turn it inside out you have the right side of the fabric showing as your headband. Leave an inch roughly in the middle unsewed and open so that you can turn the fabric inside out with the Loop Turner. See images below.

Now get sewing :)

Here I am sewing the 5/8" seam allowance I allowed for when cutting the fabric out

Gap left to turn the fabric inside out

Now trim down the edges so there is no excess unnecessary fabric.

Take your Loop Turner

Place it through the hole you left unsewed and push to one end of the headband and hook the material onto the Loop Turner like the image below.

Then start pulling the Loop Turner downwards while pushing the fabric up so you can pull the Loop Turner that is hooked to the fabric out of the hole you left in the middle of the fabric. This will help you pull the fabric out and turn it inside out.

Like so..

Do the same to the other end of the headband pull it through the hole and your headband will be turned inside out.

Now you want to Iron your seams flat.

Apologies for the weird shadow going through these two images, I think my camera just had a malfunction.

Now you can insert your wire through the hole in the middle you left unsewed.

Measure your wire to the same measurement as your headband length but you can add 2cm on each end so that you can bend it over like the image above. By bending the end of the wire it prevents it tearing through the headband. Then push the wire into your headband fabric.

After your put your wire in you can bend it back straight so that it hits each end and you have the perfect amount of wire to twist once your headband is done.

Finally, seal the hole in the middle by sewing it closed.

Et voila!
Here are some I made earlier. Happy Sewing <3


Wednesday 1 August 2012
Introduction to "So you want to sew"
Welcome to my "So you want to sew" blog.
This blog was made to teach and inspire those who love sewing, being creative and making things in the world of crafts, costume, fashion and homeware. I will be doing tutorials with how to's on learning the basics when it comes to sewing aswell as more difficult lessons. I will also add any inspiring images and ideas I see and in time if we create a following I hope to encourage everyone to have a go and upload their crafts they have made :) I hope you find my blog useful. So lets get started...

This blog was made to teach and inspire those who love sewing, being creative and making things in the world of crafts, costume, fashion and homeware. I will be doing tutorials with how to's on learning the basics when it comes to sewing aswell as more difficult lessons. I will also add any inspiring images and ideas I see and in time if we create a following I hope to encourage everyone to have a go and upload their crafts they have made :) I hope you find my blog useful. So lets get started...

Subscribe to:
Posts (Atom)